Showing posts with label The Open MandP Project. Show all posts

Thursday, February 21, 2013

SJC Magwell and Slide Racker


As always, exceptional customer service from SJC. I won't go too into details, but they have won my business (Well, maybe not for gun smithing. That I like to do myself. Sorry guys).

The Magwell is about the easiest I have ever installed, whether it be on a glock, a smith and Wesson, a 1911 or an AR. Pop the big grip pin out, slap the Magwell on and tighten the included screw. Tape off the Magwell (so you don't scratch it) and grab a file to blend the polymer lip of the pistol with edges of the Magwell. Please note that if you are using Taylor freelance magazine extensions the screws on the extension retainer plate will leave superficial marks on the rear of the Magwell.

The slide Racker takes a little patience to get fitted, but no more than about 10 minutes of actual work. Once in place, I went the extra step of popping out the retaining screw and drilling a small dimple into the top of the slide so that the retaining screw would have something to grip, rather than impacting strait into the flat base of the dovetail.

All in all, great additions!


Slide Lightening


Okay, so this was in the works for a while and it finally got done. I ended up going a little conservative for now since it is a standard length slide and I don't want to take off too much material and weaken it.

No videos from the range, but it definitely eliminates a noticeable amount of recoil. The muzzle rise is about the same thanks to the compensator, but the physical force of the recoil is definitely lessened.

Might go a bit further on the sides depending how things go.


Wednesday, February 6, 2013

SJC Micro Dot Mount

This will be a little more in depth than my usual stuff, purely because of the amount of information and effort required to get this little gadget up and running. Long story short, the other mount options were not working out and it was becoming apparent to me that options were running thin, so rather than drop a couple hundred bucks to get the slide milled to accept an STS, I opted for the SJC micro mount. They were having some production hardships at the time I ordered, but they notified me early on of the delay (thumbs up for good customer service) and I got the mount with a few weeks. Make sure you specify what optic you will be using so that you get the right top plate.

Good Stuff: This is a very slick mount. It sit low, to the point that you have to remove front and back sights to get the slide back on the frame. Because it mounts to the frame, it is much more stable and more reliable (since adding weight to the slide forces you to re-tune the slide and recoil spring to account for the altered cycling attributes). Fit and finish was perfect (though to be fair, for the price I would accept nothing less).

Bad Stuff: If you are not a proficient machinist or craftsman, DO NOT INSTALL THIS YOURSELF! I have spent my entire life doing various metal and wood work, and this mount nearly pushed me beyond my own skill set. You will need to drill the frame and fit the mounting plates inside, just to the rear of the accessory rail. I was able to accomplish this with a dremel and a nearly superhuman amount of patience, but if you are anything short of a seasoned craftsman, I highly recommend you send off for SJC and have them do it. There are a dozen and a half ways in which you can ruin your pistol frame if you make a mistake, so there's no sense risking that.

Once you have the mount fitted and the pistol functions properly, it may be worth it to run a thin bead of super glue or epoxy to seal up any spaces between the the front fittings and the frame so that the front mounts don't pop out if you have to remove the mount itself. That, and if one of the screws happens to come loose, you dont want one of the little mount fixtures getting loose in your recoil springs and/or trigger group. Bad juju.

Obviously this wont fit in a standard M&P holster. If you needed to be told that, then you really have no business building something like this in the first place. My preference is the CR Speed world shoot holster (Speed Shooter Specialties sells a model adapted for use with the M&P for ~$150) but any race style holster that fits the trigger guard will do the trick.

Overall: Great mount. Price was what I expected for the amount of machining and development that has clearly gone into this mount. Updates to follow when I get a chance to go to the range, but thus far it appears to be rock solid.

Saturday, December 3, 2011

Cmore STS and BME Slide Mount

Ive been sitting on a C-more STS for awhile now and, having had zero progress on the mount i was hoping to use, I gave up and bought a regular slide mount. The model I decided to use is the BME M&P model, which holds the STS a bit higher than I would have preferred, but after seeing it all put together I may begin to change my opinion of it.

Installation was a bit interesting on a few levels. The first issue was to get the Trijicon rear sight off without sending the internal bits flying across the room. I used a MGW sight pusher tool to slide it most of the way off and put the whole slide assembly in a plastic bag to push it the rest of the way. No springs or retaining plates lost! Now on to the tough part of the job...

As i started fitting the mounting plate to the slide, it became apparent that the it would be an extremely tight fit. Tight, to the point that I had to back the mount out of the notch and file down the edges a hair. After that, it pressed snuggly into the sight groove, held fast by several set screws. The STS mounted tight, so no worries. Haven't had a chance to take it to the range yet, but will update with more info after I do.

Sunday, October 23, 2011

Apex Failure Resistant Extractor and Speed Shooter Specialties extra power extractor spring

I haven't seen more than a handful of extraction failures in this gun throughout its 15,000 round lifespan, but figure that was still too many. Picked up the Apex tactical FRE and the speed shooter specialties after marker extractor spring and set to work.

And work it was. The factory extractor pin is without a doubt the toughest fitting sumbitch I have ever laid eyes or hands on. I broke a punch, a screw driver, and bent the hell out of another punch before I relented and pulled up the Apex Youtube page for some instruction. Following their recommendations, I ground a nail punch down to the appropriate size to fit this tiny ass pin, and after a few good wacks it fell free. Installation after that was 1000% simpler, and just as uneventful.

Apex recommends 300-400 rounds to break in the extractor, but frankly I have yet to have any issues. Updates will follow if anything changes, but considering this companies already exemplary record (at least in my experience) I am not too worried about it.

Thursday, October 20, 2011

Optics

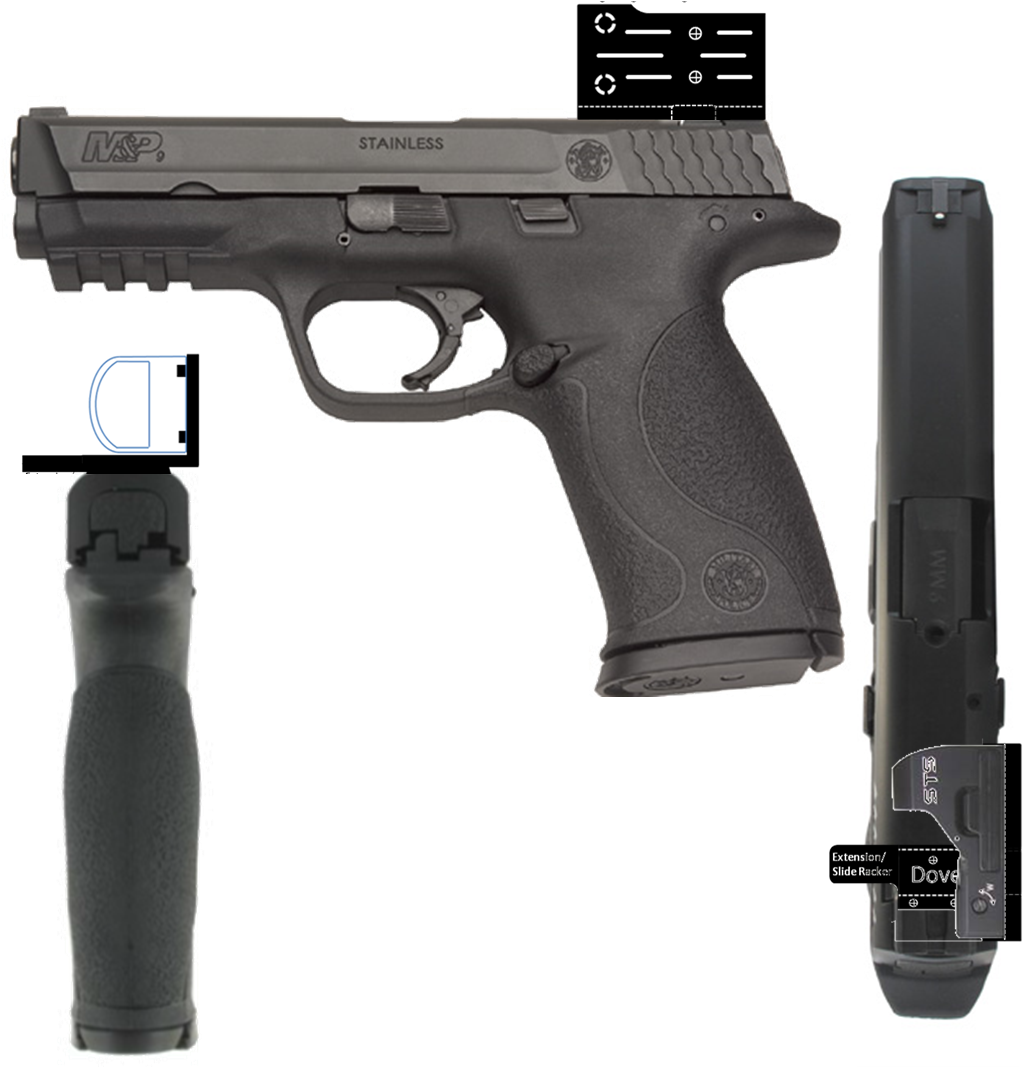
At this point I began looking for 1) an optic that would function well in a slide mount and 2) a mount that would play to my strengths. The pics attached are very rough initial sketches and i'm far from being a talented photoshop gangsta, so bear with me.

Through research, my list dwindled down to the C-more STS or the Leupod Delta-point. Price basically made the decision for me. I settled on the STS. Now I had to figure out how to mount it.

I have used traditional slide mounts in the past, and found it difficult to get the dot on target as fast as I would like. I practice primarily with an iron sighted .22 pistol, and having the HUD so high above the slide was giving me problems (primary issue is that the dot is so high and the base of the dot is so bulky that it eliminates any other visual references like the front sight or the front portion of the slide. secondly, because I practice with iron sights, trying to adjust my point of aim off the draw was just taking too much time and effort)). Looking around the shooting world for inspiration, I noticed a lot of people using 90degree optic mounts for their Cmore slide rides, and decided to borrow the concept and adapt it to the M&Ps rear right dovetail. This way, I keep the slide and front sight in my peripheral vision as references and keep the dot as close to the bore as possible. Fortunately, the left side of the STS is flat and facilitates this. What I came up was this (not to perfect scale, I know):
Now I have to find someone with better machining skills than me to make it a reality. If it works out the way I hope it does, it will eventually be refined into a more competition oriented version along these lines:
Updates to come if/when I get ahold of the real thing. Clearly there will be some spring and load tuning work happening concurrently, so it should be a relatively meaty update. Aiming through a backward D will surely take some getting used to, but as I'm more comfortable shooting right-to-left than left-to-right it still plays to my strengths. In theory this is what it should look like:

X-Treme Grip System

Grip enhancement went without saying. This was just the easiest for me, without sending my frame off for stippling. The whole kit was pretty cheap and easy to install, and came with enough grip tape to cover pretty much the whole frame. I only used enough to cover the areas pictured because thats all Ireally wanted, but if you want more then go nuts.

Only issue I have encountered so far is that the edges come up slightly. That is mainly my fault. The instructions recommend using a heat gun and a roller to form the tape to the grips, and I didn't use either of those tools.

Carver Custom Compensator

Carver Custom is more widely known for making Glock compensators, but I'm glad to see they have expanded into the M&P market. What made their product stand out to me above and beyond SJC and Jaeger products is 1) that the lines are more aesthetically pleasing on the front of an M&P, and 2) it includes a section that fits over the end of the recoil rod (I'll explain why this is important to me in a moment).

The product I received was immaculate. I honestly cannot find fault with it so far. Having had time to test it out, my only suggestion to Carver in the future is that I would like to see a 4- or 5- port model offered to handle higher power factor ammunition. Using factory ammunition for comparison (I'll get to the handloads in another post, so bear with me) barrel rise went from ~8" on a 20 yard target to ~3". Considering I had yet to add any kind of extra weight (tungsten guide rod, mag well, etc) it showed a lot of promise, especially since I was working with 115 and 124gr ammunition. I plan on using 90gr XTPs down the line for steel shooting, so the increased pressures should do nothing but improve the comp efficiency.

Now onto why the guide rod hole is important to this build.

The only downside to this comp that I see is that it has to be held on by thread locker (I was using red loktite). This is a pain in the ass because it cannot be easily removed for cleaning, and something I very much would like to remedy. My solution to this was to use a full length M&P9L guide rod from speed shooter specialties in place of the regular M&P rod. I can hear you ("WTF? he cant do that... can he...?).

Because the barrel, comp and guide rod remain parallel during recoil, it makes it possible for the longer guide rod to extend through the front of the frame and fit easily into the hole in lower section of the compensator, holding it in place with little or no thread locker. No thread locker means the comp is removable for cleaning. Problem solved.

Storm Lake Threaded Barrel

The threaded barrel offered by Storm Lake is not cheap, but not as bad as some others out there. The finish quality is very good, but a good polishing never hurt anyone. Initially there was no real issue with function, bAfter a little elbow grease and some fine grit polishing compound, the movement of the slide was noticeably smoother. Initial accuracy testing was conducted without a compensator or any spring changes, and produced about a 25% decrease in group sizes. At this point, I was able to pick off 18" targets out to 80 yards and 10" targets out to 50 yards without much trouble at all.

I believe there are other companies that make threaded M&P barrels, but as this is the only one I have significant experience with, I will not be comparing them here.

Trigger and Internal work

Because of the limited number of aftermarket trigger modifications for the M&P, the one from Apex Tactical floated right to the top of the list. The only other one I am aware of is from Speed Shooter Specialties and is basically refined Smith and Wesson OEM parts. I don't have an issue going that route, but because Apex provided a full-up kit at a reasonable price (about half of what you would expect to pay for a similar Glock kit) I jumped on it.

As i have posted on my other pages, the reduction in pull weight and the vastly improved smoothness of the trigger pull was immediately apparent. The length of trigger pull is still a bit more than I would prefer, but its certainly manageable with practice. Since installing the competition kit, Apex has also brought another kit to market (the Forward Set Sear) that more closely replicates the trigger pull of a 1911, so if it becomes to much of an issue I may have to upgrade further.

Don't get me wrong, though. The CAEK is not a bad product my any stretch of the imagination; simply a different approach to creating a smooth, crisp competition trigger. I would not hesitate to recommend it.

In The Beginning

I started this project a while ago, but have gotten enough questions that I might as well give it its own page. The base platform for this project is a standard Smith and Wesson M&P9 semi automatic pistol. I did not opt for the longer barrel Pro or 9L versions because at the time there was no usable method for frame mounting an optic to the M&P. I have since seen that SJC has started work on just such a mount, but since my first attempt will feature a slide mounted optic I wanted to keep the slide mass to an absolute minimum to simplify the inherent limitations and spring/slide weight/load PF that would be involved in this project.

My goal here is to initially build an effective, but moderately priced open-class race gun for steel shooting. Once I have that worked out, I will probably start venturing into the higher power factor USPSA arena (not 100% that will include major PF, but we'll see how things go).